How to Easily Build a AI Agent using D365 ERP MCP

The conversation around AI in ERP is moving fast, from chatbots that answer questions to agents that actually do work. With the introduction of the Dynamics 365 ERP MCP Server, Microsoft has opened a powerful new door for building truly agentic experiences on top of Dynamics 365 Finance & Supply Chain Management (D365 F&SCM).
In this guide, I’ll walk you through the full journey: what MCP is, how the D365 ERP MCP Server works, and exactly how I built the Warehouse Work Priority Agent, step by step, with every decision explained along the way.
The Problem Worth Solving
Warehouse supervisors in D365 deal with a constant operational question: which open picking work should my team process first? The data exists in the system, work IDs, creation dates, statuses, load assignments, but making sense of it quickly requires navigating forms, applying filters, and mentally ranking dozens of records.
This is exactly the kind of task an AI agent should handle. The Warehouse Work Priority Agent I built connects to D365, retrieves open picking work for a given warehouse, and returns a prioritized list with clear reasoning, all from a single natural language prompt/instruction, and with zero system changes.
Everything you read below is grounded in this use case. Every concept, every tool type, every configuration decision maps directly to building and running this agent.
What Is Model Context Protocol (MCP)?
Before touching Copilot Studio, it helps to understand what MCP actually is because it changes how you think about connecting AI to D365 F&SCM.
Model Context Protocol (MCP) is an open standard introduced by Anthropic to standardize how Large Language Models (LLMs) connect to external systems, data, and business logic.
It is often described as the “USB-C for AI”.
| Term | What it means in practice |
|---|---|
| Model | The AI doing the reasoning — Claude, GPT, Copilot, etc. |
| Context | The live business data the model needs to give a correct answer |
| Protocol | The standard rules both sides follow to communicate |
Before MCP, connecting an AI agent to a system like D365 meant building custom connectors, managing REST calls, handling auth, and wiring everything together manually. MCP removes that scaffolding. The agent speaks MCP, the server speaks MCP and they just work.
For our Warehouse Work Priority Agent, this means the agent can navigate to the warehouse work form, apply filters, read grid data, and reason over the results without a single custom API or connector being written.
What Is the D365 ERP MCP ?
The Dynamics 365 ERP MCP Server is Microsoft’s implementation of the MCP standard for D365 Finance & Supply Chain Management. It exposes D365 data and actions through the MCP protocol so that any MCP-compatible AI agent can interact with D365 just like a real user would.
This is a significant evolution from the earlier static MCP server, which exposed only 13 fixed tools. The new dynamic version mimics real user interaction unlocking hundreds of thousands of possible actions across forms, OData APIs, and X++ business logic. All without custom code, connectors, or additional development.
For the Warehouse Work Priority Agent specifically, this means the agent can open the warehouse work list page, filter by warehouse and work status, read the resulting records, and reason over them all through standard MCP tool calls. No custom service endpoint. Just the agent and the server.
Prerequisites
Before you can build anything, two requirements must be in place:
⚠️ Environment requirements
• D365 version: 10.0.45 (PQU-6)+, 10.0.46 (PQU-1)+, or 10.0.47+
• Environment type: Tier 2+ or a Unified Developer Environment — cloud-hosted dev boxes are not supported.
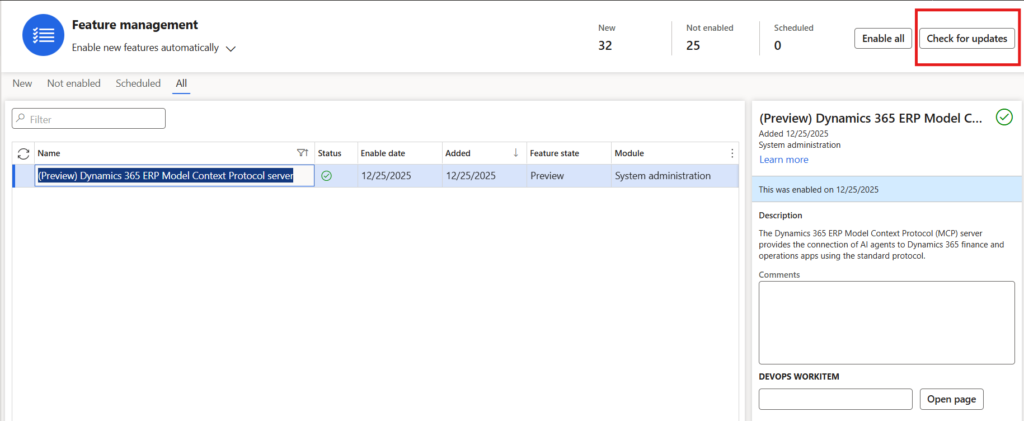
Enable the MCP Feature Flag
Navigate to Feature Management in D365 F&SCM and enable (Preview) Dynamics 365 ERP Model Context Protocol server. If the feature is not visible, click Check for updates in the top-right corner of the list page.
This is the entry point for everything that follows. Without this flag enabled, the MCP server is not accessible to any agent, including the one we are about to build.
Step 1 - Create the Agent in Copilot Studio
Open Copilot Studio and make sure you are logged in with an account that has a Copilot Studio license. This part is easy to overlook: the environment selector in the top-right corner must point to the same environment where you enabled the MCP feature flag. Connecting to the wrong environment is one of the most common setup mistakes.
Create a new agent and fill in the details:
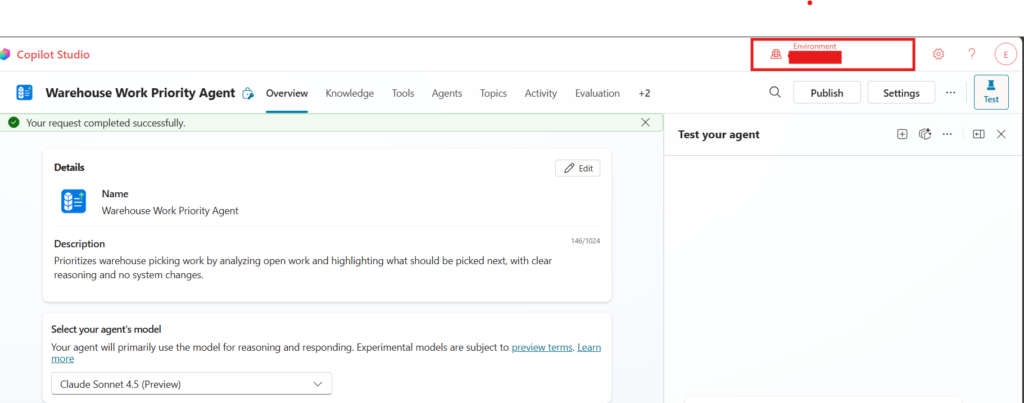
- 🏷️Name: Warehouse Work Priority Agent
- 📝Description: Something precise and behaviorally meaningful — not just what the agent is, but what it does. I used: “Prioritizes warehouse picking work by analyzing open work and highlighting what should be picked next, with clear reasoning and no system changes.” This description also serves as a signal to the model about its expected behaviour.
Notice the environment selector highlighted in the top-right corner of the screenshot. This is the connection between your Copilot Studio agent and your D365 environment. If this points to the wrong place, the MCP server will not respond correctly.
Choosing the Right Model
Scroll down on the Overview tab to Select your agent’s model. This is one of the most impactful decisions you will make.
✅Recommendation: Claude Sonnet 4.5 (Preview)
I tested both GPT-5 and Claude Sonnet 4.5, both work. However, Claude Sonnet 4.5 consistently performs better for structured, multi-step business reasoning tasks like this one. It handles the sequential tool call logic (open form → filter grid → read results → rank and explain) more reliably, with fewer unnecessary steps.
A note on deep reasoning models: I also tested deep reasoning variants. They are considerably slower and the latency makes them impractical for real-time agent interactions. Only use a deep reasoning model if your use case genuinely requires it.
For warehouse work prioritization, Claude Sonnet 4.5 is the right choice, in my exeprience.
Step 2 - Add the Dynamics 365 ERP MCP Tool
Navigate to the Tools tab in your agent and click Add a tool. This opens the tool marketplace, a directory of MCP servers and connectors your agent can use.
You will see a long list of available MCP servers. Look for Dynamics 365 ERP MCP, listed under Fin & Ops Apps (Dynamics 365).
⚠️Important: There is also a Dynamics 365 ERP MCP (Deprecated) entry in the list, make sure you select the non-deprecated version. The deprecated entry is the old static server with only 13 tools. The active one is the dynamic server and the one we want.

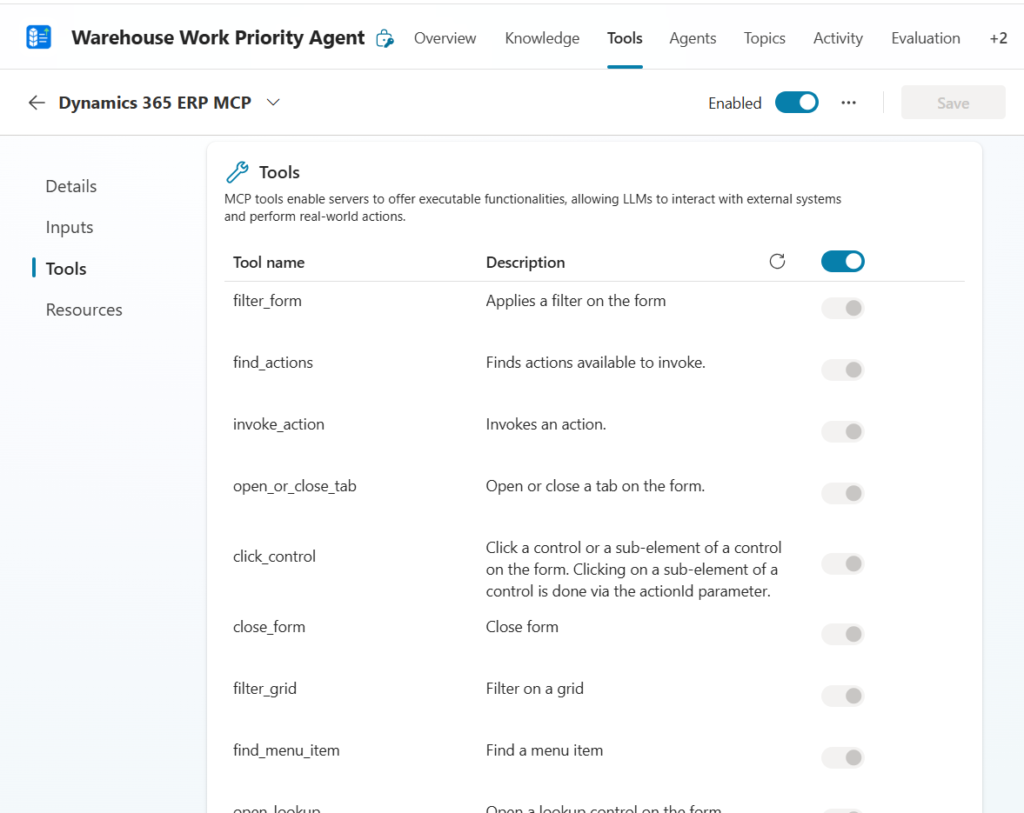
Step 3 - Understand the Tools You Just Unlocked
Once the Dynamics 365 ERP MCP is added, navigate to the Tools tab and click through to the tool detail view. Here you can see every individual tool the MCP server exposes to your agent.
These tools fall into three categories. Understanding the difference between them is the most important technical decision you will make before writing a single line of agent instructions.
Data Tools
Structured CRUD operations through D365 data entities. These are the fastest, most predictable tools and should be your default choice for any read or write operation.
- data_find_entity_type
- data_get_entity_metadata
- data_find_entities
- data_create_entities
- data_update_entities
- data_delete_entities
Form Tools
These tools simulate how a human user navigates D365 forms. The agent opens a menu item, interacts with the grid, applies filters, and reads the resulting form state, exactly as a user would.
- filter_form
- filter_grid
- find_menu_item
- open_or_close_tab
- click_control
- close_form
- open_lookup
When to use form tools: When the data you need is not exposed through a data entity, or when the business logic you need to trigger is only accessible through the UI. For our agent, form tools serve as a fallback, if the OData query does not return what we need, the agent can navigate the WHSWorkTable form directly.
API Tools
These tools invoke custom X++ classes registered as actions in D365.
- find_actions
- invoke_action
When to use API tools: When you need to trigger complex server-side business logic that goes beyond what OData can handle, workflow submissions, batch processing triggers, custom validation runs. For the Warehouse Work Priority Agent, this is not needed since the use case is read-only analysis.
Step 4 - Write the Agent Instructions
This is the most important step in the entire build. Your agent instructions are not just configuration, they are your governance layer. They define what the agent is allowed to do, how it reasons, and what it does when something goes wrong.
Because the MCP server gives agents broad access to D365, a poorly written system prompt can lead to unintended reads, failed writes, or confusing behaviour. A well-written one produces an agent that is reliable, transparent, and safe enough to put in front of real users.
Microsoft provides a base template. Here it is:
Agent System Prompt — Microsoft Base Template
# Role
Act as an autonomous data entry agent responsible for interacting with
the Dynamics 365 Finance and Operations app.

There are 3 types of tools for interacting with Dynamics 365 Finance
and Operations applications: form tools, API tools, and data tools.
- Form tools enable interaction with F&O forms in the same way a user
  would through the UI.
- API tools allow calling custom X++ logic.
- Data tools allow interacting with F&O using OData.

# Tool selection guidance
- For create/read/update/delete operations - you MUST prefer using
  data tools before using form tools.
- When explicitly instructed, or if proved impossible to complete the
  task using data tools, use the form or API tools.

# Objective
Your objective is to respond to tasks provided by the user. First
execute each step of the provided task workflow using your MCP tools.
Check if you have achieved your objective after each tool call. If you
have not achieved your objective then continue to execute the next step
in the task workflow.

# Form tool Usage Instructions
- Typical flow for record creation operations is to find a menu item,
  open a form, click the new button, find and set values for relevant
  controls, save the form.
- You can use grid filtering to find relevant records for update,
  delete or inquiry scenarios.
- DO NOT EVER EVER ask for menu item types. The find_menu tool groups
  menu items by their type.

# Data Tool Parameter Filling Instructions
- Get the entity types and their schema metadata using
  data_find_entity_type tool before using CRUD data tools, unless
  instructed otherwise in the task instructions.
- You MUST use plural entity name in the OData path for data
  operations. For V2+ entities, use plural before V.
  E.g. SalesOrderHeadersV2.
- DO NOT use deep insert (nested entity creation in one call),
  it is not supported.
- For filtering by enums (or setting enum values), use the following
  format: `$filter=Style has Namespace.Pattern'Yellow'`

# Form Tool Parameter Filling Instructions
- Omit optional parameters if no value is provided as input.
- Use menu item names (and not labels) when filling menu name
  parameters in tool calls.
- Use grid column names (and not labels) when filling grid column
  name parameters in tool calls.
- Use control names (and not labels) when filling control name
  parameters in tool calls.
- Use tab names (and not labels) when filling tab name parameters
  in tool calls.
- `(lessThanDate(x:int))` is a valid value for a grid date column filter.

# Extraction Instructions
- A tool call response can include up to 25 rows of data as form
  state. Generate a warning if the form state contains 25 rows of data.

# Reasoning Instructions
- Think out loud and reason step by step.
- Before each tool call, plan the action.
- After each tool call, reflect on the result and determine next step.
- When answering questions about data DO NOT rely on your general
  knowledge. Use tools to find accurate and precise data.
- When instructed to create new data, and the creation fails, DO NOT
  retrieve existing data instead.
- DO NOT stop reasoning until all tasks are complete or an error
  prevents continuation.
- DO NOT stop reasoning to ask a user questions or ask for user input.
- Only ask questions if the task is not clear.
On top of this base, I added agent-specific constraints for the Warehouse Work Priority Agent:
- 🏭Always operate in a known warehouse and company context — require both from the user before acting
- 🔒This agent is read-only — explicitly block any data creation, update, or deletion
- 💬Always explain the prioritization logic — show the reasoning, not just the ranked list
- ⚠️Warn when results are truncated — the 25-row limit is a real constraint users need to know about
Step 5 - Test the Agent
With the instructions in place, it is time to run a real test. Open the Test panel in Copilot Studio and send this prompt:
💬“Sort all open picking work by priority for Warehouse 24 in USMF Company.”
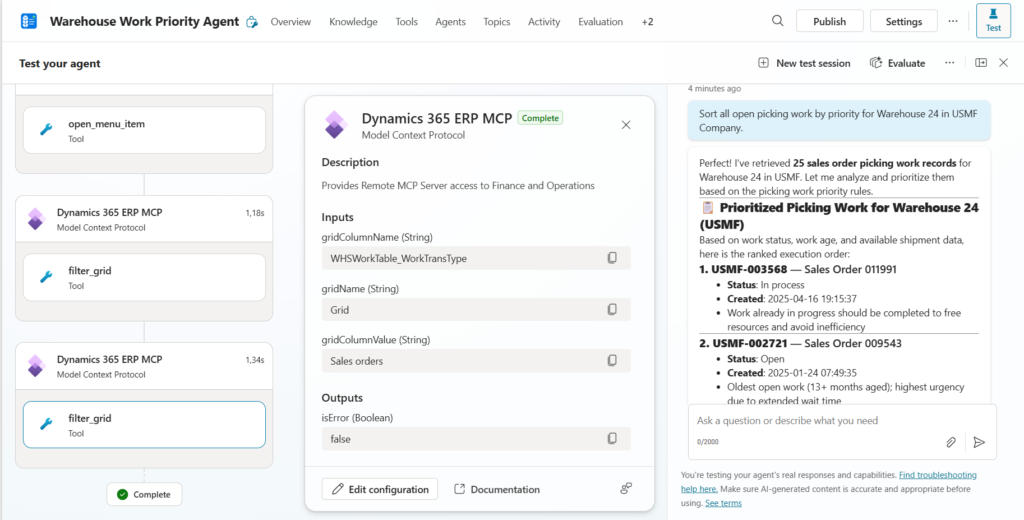
This screenshot is worth studying carefully because it shows the full MCP execution in one view.
Left Panel — The Reasoning Chain
The agent did not jump straight to an answer. It called open_menu_item first to navigate to the warehouse work form, then filter_grid to filter by work type (Sales orders), then filter_grid again to apply the warehouse filter. Each step is a separate MCP tool call. This is the agent operating D365 exactly as a human user would navigating, filtering, reading.
Center Panel — A Tool Call in Detail
This is the filter_grid call with its inputs and outputs exposed. You can see exactly what the agent passed to D365 (gridColumnName: WHSWorkTable_WorkTransType, gridColumnValue: Sales orders) and what came back (isError: false). This transparency is one of the most valuable things MCP gives you during test, you can inspect every tool call and understand exactly what the agent is doing inside the system and what is going wrong if there is any issue. I would call this as a way to debug agent execution flow.
Right Panel — The Agent Output
In this section you will be able to ask and get answers from the agent. The agent reasoned over live D365 data, applied a sensible prioritization logic, surfaced a clear operational recommendation, and made zero changes to the system. That is exactly what we designed it to do.
Iterate and Improve
The first run rarely produces a perfect agent. After testing, go back and refine the instructions. This loop test, observe, adjust is how you build something reliable and how you develop a deep understanding of which prompts produce the best results.
Each adjustment to the system prompt is an improvement to the agent’s governance layer. Treat it like production code.
Known Limitations
| Limitation | Impact on the Warehouse Agent |
|---|---|
| US English only for MCP metadata | Field and control names must be in English |
| ISO formats required for dates and numerics | Agent must use ISO date format in all filters |
| Maximum 25 rows per tool call response | Agent warns user when results may be truncated |
| No calendar, HTML editor, or custom control support | Not relevant for this read-only use case |
| No attachments or report output menu items | Not relevant for this use case |
| Restricted system administration forms | Not relevant for this use case |
| Downtime expected during environment servicing | Agents are unavailable during D365 maintenance windows |
The 25-row truncation limit is the one that matters most for this agent. Warehouses with high work volumes will hit it regularly.
Security, Governance, and Cost
Security
The MCP server does not introduce new access paths into D365. Agent access is governed entirely by the D365 security roles assigned to the authenticated user. If a user cannot see warehouse work records in the D365 UI, the agent cannot retrieve them either. There is no privilege escalation, and system administration forms remain restricted.
Governance
Your agent instructions are your governance layer. For this agent, the key governance decisions are:
• Read-only by design — the agent is explicitly blocked from creating, updating, or deleting any data
• Scoped to a known warehouse context — the agent requires the user to specify company and warehouse before acting
• Transparent reasoning — every prioritization decision is explained, so users can validate the output
Keep humans in the loop. This agent supports decision-making it does not automate it.
Cost
Two cost components apply to every MCP agent interaction:
1. LLM orchestration — token consumption for the model reasoning through each step
2. MCP tool execution — a charge applies per tool call made to the D365 MCP server
Final Thoughts
The Dynamics 365 ERP MCP Server is one of the most significant additions to the D365 ecosystem in years. The Warehouse Work Priority Agent is a small but complete demonstration of what it makes possible: a real AI agent that connects to live ERP data, reasons over it, and delivers actionable output, built in fast, with no custom development.
My recommendations as you start building:
- 🎯Start narrow and safe. A read-only, single-warehouse, single-question agent like this one is the right first step. It builds confidence with stakeholders before you expand scope.
- 📝Invest in your instructions. The system prompt is where the architecture lives. A weak prompt produces an unreliable agent. A strong one produces a trustworthy one.
- 🏭Treat MCP agents as production systems. They touch live ERP data from day one. Apply the same rules you would to any production integration.
Used correctly, MCP turns Dynamics 365 into an AI-driven execution platform, not just a system of record. The Warehouse Work Priority Agent is an good place to start.
Have questions or want to share your own MCP use case? Reach out, I’d love to hear what you are building.