How to add a new document in Print Management setup in D365F&O
Print management is the framework that we use in Dynamics 365 Finance and Operations to configure print settings for various business documents (SSRS Reports), including sending emails, archiving, saving as a file, printing automatically, or just displaying at the screen. Print management setups are typically separated by module and for each module, there are different nodes for all business documents that are available to be printed.
How to add new document in Print Management - WHS Module
Sometimes you need to create new business documents in Dynamics 365 F&O. So you need to add this business document/report in the Print management form setup.
To add this new document in Print Management you should follow those steps:
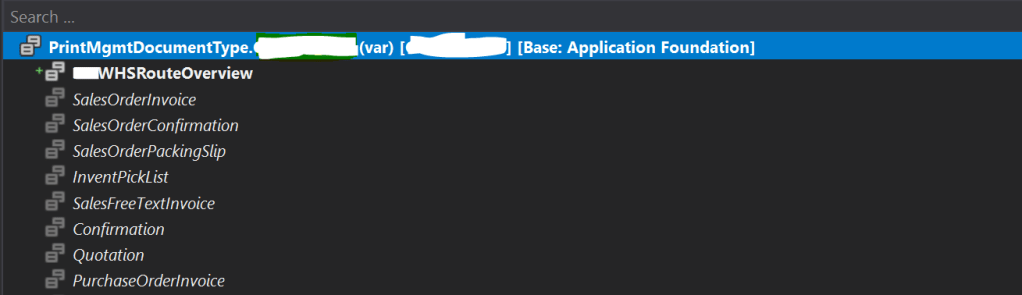
Step 1: Extend the PrintMgmtDocumentType Enum
Create an extension of PrintMgmtDocumentType base enum and add a new node that will represent your new document. (Ex. WHSRouteOverview)
Step 2: Add the Document Type to the WHS Print Management Node
In our case, we should add our new document to the WHS module. Based on which module you should add your custom document, extend PrintMgmtNode class. I extended WhsPrintMgmtNode_WHS and I added the following code to add the custom document type.
[ExtensionOf(classStr(WhsPrintMgmtNode_WHS))]
final class WhsPrintMgmtNode_WHS_Extension
{
    public List getDocumentTypes()
    {
        List docTypes;
docTypes = new List(Types::Enum);
docTypes = next getDocumentTypes();
docTypes.addEnd(PrintMgmtDocumentType::WHSRouteOverview);

        return docTypes;
    }
}
Step 3: Register a Default Report Format
For this business document you should add a default report in the Printer Management setup. To add a default report we should subscribe to the NotifyPopulate method of PrintMgmtReportFormatPublisher class and add the following code.
[ExtensionOf(classStr(PrintMgmtReportFormatPublisher))]
public final class PrintMgmtReportFormatPublisher_Extension
{
    [SubscribesTo(classstr(PrintMgmtReportFormatPublisher),
                 delegatestr(PrintMgmtReportFormatPublisher, notifyPopulate))]
    public static void notifyPopulate()
    {
        #PrintMgmtSetup
void addFormat(PrintMgmtDocumentType _type, PrintMgmtReportFormatName _name,
                   PrintMgmtReportFormatCountryRegionId _countryRegionId = #NoCountryRegionId)
        {
           AddPrintMgmtReportFormat::addPrintMgmtReportFormat(_type, _name, _name,
               _countryRegionId);
        }
addFormat(PrintMgmtDocumentType::WHSRouteOverview,
                      ssrsReportStr(WHSRouteOverviewReport, Report));
    }
}
Step 4: Create a Helper Class to Insert Report Formats
Create a reusable helper class to insert records into the PrintMgmtReportFormat table.
This prevents duplicate records and follows best practices.
public class WHSAddPrintMgmtReportFormat
{
    public static void addPrintMgmtReportFormat(
        PrintMgmtDocumentType _type,
        PrintMgmtReportFormatName _name,
        PrintMgmtReportFormatDescription _description,
        PrintMgmtReportFormatCountryRegionId _countryRegionId,
        PrintMgmtReportFormatSystem _system = false,
        PrintMgmtSSRS _ssrs = PrintMgmtSSRS::SSRS)
    {
        PrintMgmtReportFormat printMgmtReportFormat;

        select firstonly printMgmtReportFormat
            where printMgmtReportFormat.DocumentType == _type
               && printMgmtReportFormat.Description == _description
               && printMgmtReportFormat.CountryRegionId == _countryRegionId;

        if (!printMgmtReportFormat)
        {
            printMgmtReportFormat.clear();
            printMgmtReportFormat.DocumentType = _type;
            printMgmtReportFormat.Name = _name;
            printMgmtReportFormat.Description = _description;
            printMgmtReportFormat.CountryRegionId = _countryRegionId;
            printMgmtReportFormat.System = _system;
            printMgmtReportFormat.ssrs = _ssrs;
            printMgmtReportFormat.insert();
        }
    }
}
Step 5: Define the Default Report for the Document Type
Now associate your custom document type with its default SSRS report.
Subscribe to the getDefaultReportFormatDelegate delegate on PrintMgmtDocType.
This ensures D365FO automatically selects the correct report design.
public static class PrintMgmtDocType_Extension
{
    [SubscribesTo(
        classStr(PrintMgmtDocType),
        delegateStr(PrintMgmtDocType, getDefaultReportFormatDelegate))]
    public static void getDefaultReportFormat(
        PrintMgmtDocumentType _docType,
        EventHandlerResult _result)
    {
        switch (_docType)
        {
            case PrintMgmtDocumentType::WHSRouteOverview:
                _result.result(
                    ssrsReportStr(WHSRouteOverviewReport, Report));
                break;
        }
    }
}
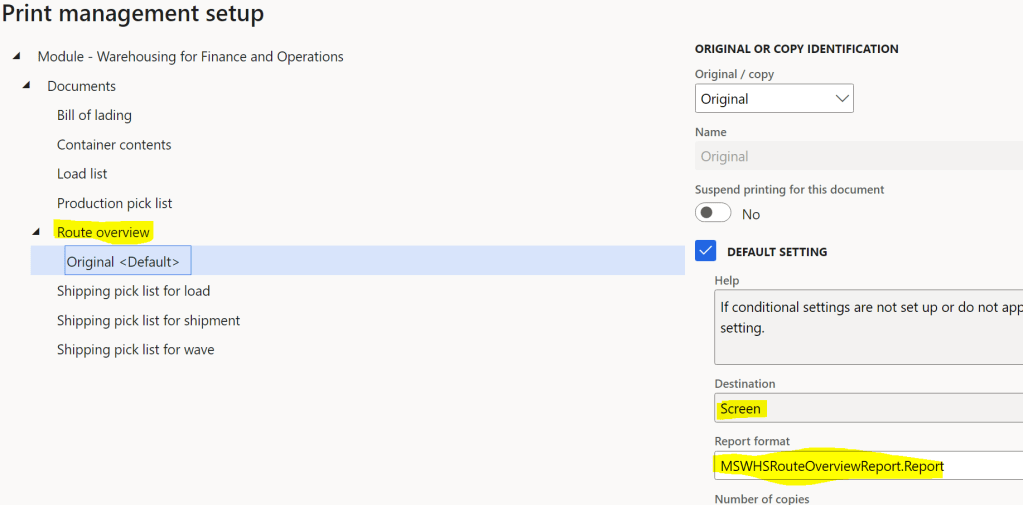
Step 6: Configure Print Management in the User Interface
Your custom document is now fully registered and ready to use.
Navigate to:
Warehouse management > Setup > Warehouse management parameters
Open the Print management tab
Click Print management
Locate your custom document under the WHS module
Right-click the document and create a new print setup
Here you can define printing rules, destinations, email templates, and more.
Where Else Can Print Management Be Found?
Print Management is not always obvious to locate. Depending on the module, it may be available:
As a Print management tab on the module parameters form
Under Form setup
Example for Sales documents:
Accounts receivable > Setup > Forms > Form setup > Print management
Want to Learn More?
If you want to know how to customize a SSRS report in D365 F&O, check out our detailed guide here that walks you through the process step by step.